|
HKC KNITTING MACHINES |
|
BUY WITH CONFIDENCE OVER 26 YEARS IN MACHINE KNITTING |
![]()
![]()
I first published this eBay guide in October 2008 they have proved to be very popular so I have included them within my own website. I intend to bring these guides up to date from time to time, so please bookmark this page. I hope you find it useful.
KNITTING MACHINES: PART 1, INSTALLING A BROTHER RIBBER
This is a two part guide on the Brother ribber.
Part 1 is installing your ribber properly onto the knitting machine.
Part two is making the necessary adjustments before knitting & can be
found under the title:
KNITTING MACHINES: PART 2, ADJUSTING A BROTHER RIBBER
About this Guide:
I have written this guide to help you understand how to be able to set
up the Brother Ribbing attachment in conjunction with the range of main
bed Brother Knitting Machines. It has been written from an engineer’s
point of view to help you make the necessary adjustments to enable you
to setup the ribber properly allowing you to get the very best finish
from your work. I have not tried to cover all of the features or the
full workings of the gadget, I have not covered any of the many knitting
techniques you can use with a ribber, I may do that later in another
guide.
Disclaimer:
I must make it clear I have written this guide from my personal
experience, I may not have covered 100% of all aspects of the topic. In
some cases I am giving you my opinion, I accept that others may not
agree. I accept no responsibility for any mistakes what so ever. Any age
of these machines given is very approximate and is based from the date
of writing this article 9th April, 2008.
About us:
Carol has been a machine knitter for over twenty six years & has been
selling machine knitting since 1985 when we started our first shop.
Lionel is a Brother trained Knitting Machine engineer, he does all of
our repairs & servicing, he has supplied all of the technical
information for this guide. Now we specialize in supplying and servicing
the range of Brother Knitting Machines. We have probably the largest
range of spares and second hand refurbished Brother Machines in the
UK. Carol has designed and published nineteen pattern books for machine
knitting.
Index for this guide:
1. Advice on buying a ribber.
2. Getting ready to set up the ribber.
3. Installing a sponge bar.
4. Installing the Ribber.
1. Buying a second hand Brother Ribber:
First of all before you bid or buy I recommend you have a read
of another of my companion eBay guides,
Title:
A ROUGH PRICE GUIDE FOR S/H BROTHER KNITTING MACHINES:
This guide will help you make sure that you ask the correct questions
and don’t pay too much for the equipment. You need to make sure that all
of the components are with the ribber when you buy it, a small item such
as a setting plate or a rise and fall bracket can be very expensive to
replace if it’s not with the ribber when it arrives. One of the problems
when buying a second hand ribber is that frequently the two upright legs
can be bent out of shape. To work properly the connection point on the
top of each leg should be at a 90 degree angle to the leg itself,
frequently you will find the legs have been bent down, this is normally
due to the previous owner constantly leaning on the ribber whilst
working on the top bed. This problem with the legs normally is
accompanied by a bend in the middle of the bed itself, I call it a belly
bend, this can be so bad it makes the ribber useless other than for
spares. So before you buy have a good look to see that everything is
square by eyeballing the ribber along it’s length thoroughly.
You should also be aware of the difference between the two popular Brother standard gauge ribbers available, the KR830 is the older of the two it will knit Jacquard but with a stripped finish on the back of the knitting, the KR850 is the younger, it has the ability to do full Jacquard with a birds eye finish on the back of the knitting. The Brother Chunky machines KH230 (the plan knitter) takes the KR230 ribber, the Punch-Card KH260 & the Electronic KH270 both take the KR260 ribber. have a read of my eBay guide title: KNITTING MACHINES - BROTHER ACCESSORIES EXPLAINED
Important Note:
I will be using & referring to the KR850 throughout both these
guides but the principals are the same for all of the ribbers, if in
doubt then you must refer to the instruction book for your model of
ribber or machine.
2. Before You Start Setting Up The Ribber:
A lot of problems with a ribber stem from the machine and the ribber
being misaligned so I will show you the correct way to improve your
finished work and hopefully save you from damaging either your machine
or the ribber by setting up and adjusting the ribber (I will be covering
the adjustments in Part 2.). However before you start you must make sure
that both the main bed and the ribber have a good bed of needles. Any
bent or sticky needles must be replaced.
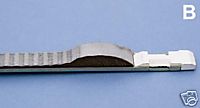
You will also need to make sure that the main bed has a sound sponge bar properly installed. If your sponge bar looks like 'A' puffed up, nice and springy then that's good but if it looks like 'B' flat then you will need to replace it. A sponge bar like 'B' will almost certainly lead to damage.

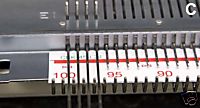
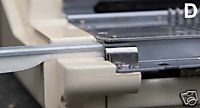
The purpose of the sponge bar is to keep the needles pressed down tight against the knitting bed whilst allowing them to have some vertical movement but always returning to their original position. See pictures 'C' & 'D' below.
A poor sponge bar allows the needles to ride high and possibly collide with the sinker plate or the ribber joining plate, not a good situation. The standard gauge ribbers do not have sponge bars but use a plastic needle presser bar or retaining bar, unless this brakes it does not need to be replaced. The chunky ribbers use a sponge bar so this will also need to be in good condition. A sponge bar will degrade even when not in use, probably quicker. A rough estimate is once installed a sponge bar is good for a maximum of eighteen months to two years, if in doubt then change it. The principles used to setup and adjust the chunky ribbers KR230 & KR260 are very similar to those used when setting up a standard gauge machine.
3. Installing a sponge bar:
The sponge bar goes sponge down, over the top of the needles,
see picture 'D'. Start from the right hand side of the machine, holding
down the needles with the flat of your left hand slowly insert the
sponge bar and move the bar over the needles held down, now slowly move
your way along the bed until the bar is fully installed. One last thing,
all the needles must be held down by the sponge bar pressing down on the
top of the needles, the needles will then be flat against the number
strip, see picture 'C'.
4. Installing the Ribber:
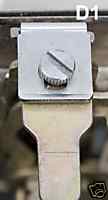
Now let’s begin to setup the two beds for the first time, I will be
working with the most common ribber the KR850, the KR830 differs in that
it has no setting plates but has self locating rise and fall brackets
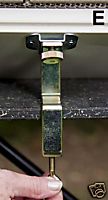
see photo D1. Start by removing the carriage, mast, knitting & any loose
tools from the main bed. Take the two raised G clamps & connect them to
the bottom of the knitting machine then lock them down firmly to both
the knitter & the table see photo E. The machine should be located
centrally on the table with the G clamps hard back against the table’s
front edge. I strongly recommend that you use a proper knitting table,
it will be the correct height for your comfort & correct width so that
the yarn can sit on the floor on a smooth surface, this will let the
tension mast do it’s job properly.
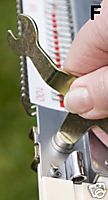
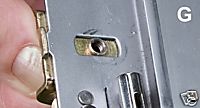
Next you need to install the left and right setting plates into the slots in the knitting machine, see photo F. Make sure that the plates do not slip under the face plate, there is a nib that protrudes on the front of the machine the setting plate should be located up against it, NOT underneath See photo G. At this stage the screw should be left loose.
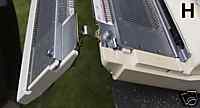
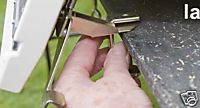
Time to connect the ribber to the main bed. With the ribber rise & fall brackets fully extended you should offer up the ribber to the machine, locate the right hand side first then you should be able to easily bring the left hand side into place into it’s setting plate see photo H. Now drop down the connecting supports and lock them to the table with the ordinary G clamps, see photo Ia, try not to stress them but they must be firmly attached to the table if the ribber is not going to end up in your lap or worse come crashing to the floor. Finally you must now tighten down the thumb nuts on the setting plates, remember do not let the setting plate slip under the face plate on the machine. Check to see that all of the G clamps are tight, don’t over do it, just tight you do not need pliers, hammers or levers hand tight should be enough.
In Part Two I will be covering the adjustment and the final preparation
so that you can get the best results from your ribber.
I have had to split the topic of the Brother Ribber into two separate guides because of the limitation on the number of photos eBay will allow in any one guide.
END OF PART 1.
We sell a wide range of fully refurbished Brother knitting machines, ribbers, accessories, books & spares.
Why not take the gamble out of purchasing a knitting machine from an auction. If you want a knitting machine or ribber that works, is complete, comes with a guarantee arrives properly packed & has after sales telephone support then buy from us. Unless otherwise stated in the listing all of our machines have been fully refurbished & tested by our resident Brother trained knitting machine engineer. Take the worry & disappointment out of the purchase, we have the expertise to look after you with a reputation for good after sales service.
Please phone me to find out what machines are going through my workshops and will soon be available for sale. Most of my refurbished machines are booked for sale before they have gone through the workshops, hence I do not sell many via my eBay shop or my website.
|
We can be contacted by phone or email
|
|
Payment: We accept PayPal, UK Cheques, Postal Orders & we take most credit cards.
|


![]()
![]()
![]()